Time has flown so fast! Its hard to believe, but its been a whole month since I met these two incredible Rockstars - Rachel Greig (left) and Dyan Reaveley (I'm in the middle, grinning like the Cheshire Cat).
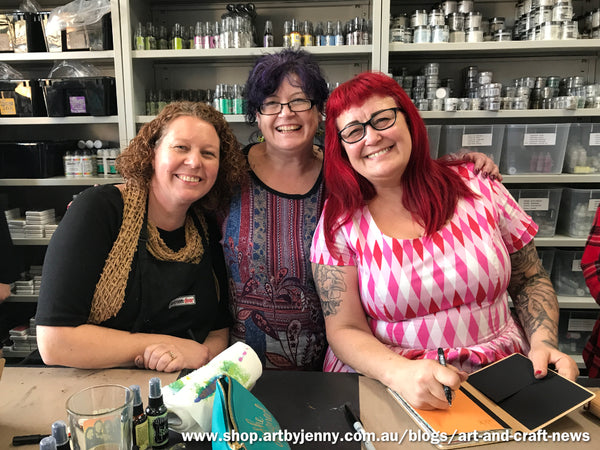
In case you don't know, Rachel is the designer and owner of Darkroom Door and Dyan is the designer and owner of Dylusions. Each artist is amazing and have so much knowledge and passion - which they give freely and generously. I'm so grateful for this opportunity that Rachel created when she organised the Dylusions traders' workshop at Darkroom Door. It was an amazing experience. Dyan was crook too, so its appreciated even more!
Late September 2017, I flew across from Adelaide to Sydney then caught the train to Berkeley Vale in the Central Coast of NSW. Its a beautiful train ride! There are hills, trees and water (rivers, inlets, ocean, dams and reservoirs) in almost every direction. I stayed in a lovely quiet Airbnb that was a few streets back from the Lake Tuggerah and the Tumbi Umbi Creek. Beautiful area :) While wandering around out I met 2 pelicans, a few ducks and a couple of ibises. Heaps of other birds were around too :)


Anyway, back to Dyan :D We were given an abundance of eye candy ... tags and journal pages by the dozens! So many gorgeous colours and groovylishus designs. The photo below only shows a small sample of it all.

To make these tags, stamp with black Archival ink then coloured with Dylusions ink in waterbrushes. You could colour these images with Jane Davenport's Mermaid Markers to get a similar effect when blending colours (or Distress watercolour markers, Distress Stains, watercolour paints, watercolour pencils, watersoluble crayons - so many ways to add colour). They're all cut out by hand (fussy-cut) and glued using the Ranger Glue Stick (which I was surprised to see, dried clear, didn't go yellow (some do) and is permanent). When she's not using the glue stick, she's using the Ranger Tape Strips (all cut down to 2-3mm wide).
I love tags... I still don't know what to do with them after they're made (apart from give away or stick in my books) but I do love them :) They make a nice change from regular shaped greeting cards and bookmarks!
The workshop with Dyan was over 2 days... the first day we chatted business tactics, drank tea n coffee, had a delicious lunch and best of all, played with Ink Sprays, Paints, Paper and Stencils!

It was fantastic to have the workshop at Darkroom Door, surrounded by all the art supplies and stamps - plus I got to see the stamp making and learn more about that side of things as well.

All you need to have a good inky arty crafty afternoon is a roll of decent kitchen paper, mixed media paper and all the colours of a rainbow in Dylusions Ink Spray. Ok, so you only really need 3 warms or 3 cools and a white, black, grey and maybe a purple - but who are we kidding? Of course we need every single colour!
When creating a whole bunch of backgrounds you'll need a whole stack of mixed media paper. Dylusions and Strathmore both work beautifully :) Butterflying pages together gives two backgrounds from one inking, saving you ink and time!
Tips... use decent quality kitchen paper, Kleenex baby wipes (the green pack, cos they aren't too wet, not too dry) and don't fret about the mess! Wear an apron if you don't have arty clothes.

There are lots of YouTube videos to watch from Dyan. She uses alot of ink but that's the best way to get those gorgeous richly coloured backgrounds we see everywhere. Just spritzing instead of making puddles doesn't allow the ink to blend before its dry and creates spattered areas that aren't fully covered. If you're not sure, try it and see for yourself :)
Video by Dyan are mostly under the Ranger Ink banner, under both Dyan's name and a playlist. Click here to check it out
This video below is of Dyan showing off her new stamps and stencils :D
This next video I found while looking for Dyan's video on colour theory (haven't found it yet! Didn't get sidetracked at all much! lol). It explains how she creates the gorgeous blended backgrounds.
To do this you will need - journal, spare mixed media sheets, kitchen paper, spray bottle of water and 3 ink sprays.
The best way to create a colour combo that's pleasing to the eye is to stick to one colour palette at a time - either warms (reds, oranges) or cools (blues, greens). Dyan is doing a video on her easy to understand explanation of colour theory too. When I do find it, I'll share it here and in Facebook.
White Linen Ink Spray - Important Info ... Always store on its side so that the powdered pigment doesn't get stuck on the end of the straw. Swirling is better than shaking (for all colours) - shaking adds air bubbles and they get stuck inside the straw and nozzle. The white pigment settles and so every few sprays, give the bottle another swirl.
Colour Tips ...
To create a pretty pale, pastel background : no need to mist the page with water first - Spray the whole page with the white ink (swirling every 6 or so sprays) then before its dry, spray with other colours.
To create a dark moody background : lightly mist the page with water, spray the areas with ink as normal, then spray with black over the top. Blot off and enjoy the results.
Remember ... there are no mistakes in art and they are only backgrounds - to be used underneath lots of other elements so don't stress! Just enjoy every arty moment :)
The next few photos are a fraction of what we did...

Faux Bleaching ... this doesn't have to be done straight away because the ink is water-reactive even after being dry for weeks, months even years! So you can create a whole pile of pretty colour papers then use them later on.
Place the stencil over the Ink Sprayed background (see above, I've covered up the middle of this stencil with another page) then spray water over the surface. Then using the kitchen roll, blot off the water and ink.

You can also do Faux Bleaching with a waterbrush... paint on the water and blot it off again. Afterwards, either leave bleached or colour them in.
Distinctly Dylusional, the book by Dyan explains everything so much better than I have here. Plus its full of beautiful step by step photos and easy to follow instructions.

Doodling with Ink Sprays... you can see from Rachel's grin that this was lots of fun! Its not a new technique, not by far - but its a fantastic reminder to everyone to think outside the bottle. Simply unscrew the ink spray and draw with the straw! Mist with water to get the colours to blend.

It wasn't all about the Ink Sprays, we used the Dylusions Paints as well. First we painted using the Ink Blending Tool and made blocks of colour.
When using a blending tool, you don't need much paint. Dab the foam of the tool into the lid and then roll the paint around on the craft mat (to work the paint into the foam). Then Lightly (very lightly, like brushing an egg with a feather), brush over the surface of the paper (with or without stencils, the technique is the same). The paint dries matte, smooth and fast!
When using alot of paint like here doing the blocks, it needs to dry for at least 12 hours before writing, drawing or doodling over with a paint pen. If not, its possible to clog up the nibs of your pens.
When using a teeny tiny amount of paint like we did in the Dyary, it can be used almost straight away because its just a light colouring, not thick paint, so cures even faster.

We also used a baby wipe to paint... again, only using a tiny bit of paint at a time. Dab one colour on the craft mat, smoosh a colour (red) all over the paper. Find a clean bit of the wet wipe and dab a second colour onto it. Wipe in 3 areas of the page (grey). Then thirdly, find another clean bit of wet wipe and with this paint, add a border (orange). Any 3 colours ... 2 warms or 2 cools and 1 neutral.
Paint Tips ... Its advised to spritz a bit of water in the jar after each day's use, especially when the jar gets down to half full. This stops the paint from thickening and this only happens because the air in the used jar evaporates the moisture in the paint.

I stepped out of my comfort zone and used pink... Bubblegum Pink, Pure Sunshine and Slate Grey. The same colours are reused through stencils, keeping the eyes happy with the colour combination... its just a background for something else so nothing needs to be emphasised.

Working with the Dylusions Dyary took up most of the second day...
We were all laughing so much during these 2 days :D It was awesome. This blog post is getting longer and longer! I took hundreds of photos and a few hours of video, in preparation of our Dyan Day here in the studio.
Before getting stuck into the Dyary, Dyan showed how she uses both the insides and outsides of the people silhouette stencils (Ben, Jay and Emmi). Nothing is wasted :) The stencil is used, then the excess ink or paint left on the stencil (or mask, the inside bit) is wiped onto an accidental page (page that is unplanned, made up of leftovers).

The Dylusions Dyary is fantastic as a journal or a diary. Things we learnt about the Dyary... its mixed media paper, just like the journals but a lighter weight, there's no such thing as a perfect to-do list, I'm not the only one who doesn't know how to plan, and most popular update to add is "gym update, still not there".

Its a fantastic book for a beginner art journal artist too, because the backgrounds have been started. This helps with choosing colours when learning colour theory too, because you can just pick a colour already on the page.

Keeping a diary or planner is just about having fun with planning, keeping memories documented. You can include photos, add pockets using postcards, draw, stamp, paint, stick, doodle, write - anything at all. There are no rules! Use it every day or every month, perpetual diaries don't have dates printed on the pages so there really are no limits.

Another fab way to use the inks is with a white marking crayon (or a clear wax resist crayon) ... just draw and then spray the inks over the top.

Coffee, ink, paint and paper - what more does a girl need? Oh, yes, stencils and stamps! Foodwise, lunch on the first day consisted of wonderful fresh salad sandwiches and quiche and salad was on the menu for the second. Deliciousness everywhere we looked!

Above: Rachel took this groovy photo of all our hands... if the wise ones hadn't added more ink to their hands, we'd just look silly with a photo of clean hands! lol :D We all are nutty about lots of colour!

A selfie :) This is at the end, just before we all left to go home. While waiting for Stewart to take the group photo (below) I took a couple of snaps.

All in all, it was amazing. I learnt a bucket load, met wonderful people and had such a fantastic time. If at any time you have questions about anything arty please ask. I'm here to help :)
Thanks for taking the time to read this far and I hope you enjoyed the photos and chitter chatter :) I don't talk much...!
Have a happy creative day!
:)
Jenny